

5.0
Owner's of the Leica Digital Camera 18450 gave it a score of 5.0 out of 5. Here's how the scores stacked up:

ISO SENSITIVITY
The ISO setting determines the possible shutter speed/aperture combinations
for a given illumination level. Higher sensitivities allow faster shutter speeds
and/or smaller apertures (for “freezing” fast action or creating a larger depth
of eld, respectively) at the expense of increasing image noise.
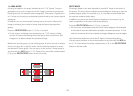
Press the
ISO
button (1.13), and in the menu appearing on the screen, select
either
AUTO ISO
for automatic setting or one of the six xed settings.
Within the
AUTO ISO
option it is possible to limit the range of sensitivities
used – e.g. to control the image noise level, and also to determine the longest
shutter speed used – e.g. to prevent blurred images of moving subjects.
In the menu, select
Auto ISO Settings
(3.3), in the first submenu either
Slowest Speed
or
Max ISO
, and the respective second level submenus the
desired settings.
Note:
The AUTO ISO value (2.1.3) set by the camera can be viewed even if the
monitor displays are switched off (see p.115) by pressing the shutter release
button (1.8, see p.107) to its first pressure point.
IMAGE PROPERTIES / CONTRAST, SHARPNESS, COLOR SATURATION
One of the many advantages of digital photography is that it is very easy to
change critical properties of an image, i.e. those that determine its character.
The Leica X2 allows you to influence three of the most important image proper-
ties even before taking the picture:
- The contrast, i.e. the difference between light and dark areas, determines
whether a picture appears as more „at” or „brilliant”. As a consequence, the
contrast can be influenced by increasing or reducing this difference, i.e. by
making light areas lighter and dark areas darker.
- Sharpness reproduction – at least of the main subject – by using the correct
distance setting is a prerequisite for a successful picture. In turn, the impres-
sion of sharpness given by a picture is, to a great extent, determined by the
contour sharpness, i.e. how small the light/dark transition is on contours in
the picture. The sharpness effect can therefore be changed by increasing or
reducing these areas.
- The color saturation determines whether the colors in the picture appear as
„pale” and pastel-like or „bright” and colorful. While the lighting and weather
conditions (hazy / clear) are given conditions for the picture, the reproduc-
tion can definitely be influenced here.
Besides the
Standard
, i.e. unchanged rendition, you can - independently - also
selected two weakened or strengthened levels for each of the three image
properties.
In the menu, select either
Sharpening
(3.10),
Saturation
(3.11), or
Contrast
(3.12), and in the respective submenus the desired settings.
Note:
These settings only come into effect with JPG files, DNG files remain un-
changed.
118


Find Your Products By Category
Please Login
