

5.0
Owner's of the Leica Digital Camera 18450 gave it a score of 5.0 out of 5. Here's how the scores stacked up:


STUDIO MODE –
This mode is intended exclusively to trigger other ash units, e.g. studio ash
units equipped with a slave function (triggered optically by the camera flash),
i.e. it cannot be used for normal flash photography.
Note:
To prevent blurred pictures with the slower shutter speeds in the modes
,
and , you should hold the camera steady, i.e. support it or use a
tripod. Alternatively, you can select a higher ISO-speed (see p. 118).
FLASH RANGE
The effective range of the flash depends on the aperture and the ISO speed
set. For good results, it is crucial that the main subject is within the appropri-
ate flash range. See the table below for details.
Sensitivity Maximum flash range
1
ISO 100 2.0m/6ft
ISO 200 2.8m/9ft
ISO 400 4.0m/13ft
ISO 800 5.6m/18ft
ISO 1600 8.0m/26ft
ISO 3200 11m/36ft
ISO 6400 16 m/53ft
ISO 12500 22 m/73ft
1
Ranges based on aperture set to 2.8. With other aperture settings, the ranges are correspond-
ingly shorter.
SYNCHRONIZATION TO THE END OF THE EXPOSURE
Flash photographs are illuminated by two light sources, the available light and
the light from the ash. Parts of the subject that are exclusively or primarily il-
luminated by the ash are almost always reproduced extremely sharply (provided
focusing is correct) due to the extremely fast pulse of light. By contrast, all other
parts of the subject – those that are sufficiently illuminated by the available light
or illuminate themselves – are portrayed with different degrees of sharpness in
the same picture.
Whether these parts of the subject are reproduced sharply or „blurred”, and the
degree of blurring, is determined by two independent factors.
1. The length of the exposure, i.e. for how long these parts of the subject „act
upon” the sensor and
2. How quickly these parts of the subject – or the camera itself – are moving
during the exposure.
The longer the shutter speed/exposure time or the faster this movement, the
more clearly the two – superimposed – parts of the picture can differ.
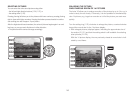
With the ash red at the normal moment, at the beginning of the exposure, i.e.
immediately after the shutter is completely open, this can even lead to apparent
contradictions, e.g. a vehicle seeming to be “overtaken” by the traces of its own
taillights.
The Leica X2 gives you a choice between this normal flash firing moment and
synchronization to the end of the exposure, i.e. immediately before the shutter
begins to close again. In this case, the sharp image is located at the end of the
movement. In the mentioned example, the taillight traces would follow the ve-
hicle as one would expect. Thus, this ash technique often gives a more natural
impression of movement and dynamics.
In the menu, select
Flash Sync
(3.14), and in the submenu the desired setting.
136


Find Your Products By Category
Please Login
