

5.0
Owner's of the Leica Digital Camera 18450 gave it a score of 5.0 out of 5. Here's how the scores stacked up:


EXPOSURE COMPENSATION
Exposure meters are calibrated to a normal, i.e. average photographic subject.
If the relevant subject detail does not meet these requirements, for example
large areas of snow or, in the opposite case, a black steam locomotive filling
the frame, and if you wish to bias the exposure identically in such cases for a
number shots, it may be more convenient to apply an appropriate exposure
compensation than to use metering memory lock every time (see previous
section).
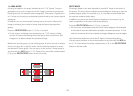
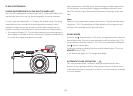
1. To set a compensation, press the upper
EV+/-
direction button (1.23) once.
• The corresponding sub-menu appears.
2. Select the desired compensation value with the left and right direction
buttons (1.24/1.27). Values from +3 to -3EV with
1
/
3
EV increments are
available.
• While setting, you can observe the eect as the monitor image gets cor-
respondingly darker or brighter.
3. Confirm the setting by pressing either the shutter release button (1.8) or the
MENU/SET
button (1.25).
• The exposure compensation symbol and the set value (2.1.21) appear.
Notes:
• An exposure compensation cannot be set when using manual exposure
mode (see p. 119)
• The
EV+/-
direction button is also used to call up the menus for exposure
bracketing (see next section) and ash exposure compensation (see p. 130).
They scroll through in an endless loop and can therefore be selected by re-
peatedly pressing the button.
• A set compensation remains active until it is set to
±0
(see step 2.), i.e.
after any number of shots and even if the camera is switched off.
131


Find Your Products By Category
Please Login
